Hi everyone,
I have decided to take the Day 100 reality challenge on co-creating your reality. Participants begin by declaring what they want to attract into their lives and for the next 100 days.
This idea has been put in place onto a website which participants can join. 3 women Laura Duksta, Sandy Grason and Lilou Mace setup this website. See the link below for more information.
http://cocreatingourreality.com/
I haven't joined the website but I will.This new challenge seems to come from nowhere. I haven't blogged in months.
When you look at my previous posts, for the last 3 years, i have tried my hands at a few things. First at writing every day about everything and nothing, then writing about art and artists, joining fantasy writings contests, interviewing writers/poets and finally creating posts on recycled card making projects.
It seems that I have been all over the place. But all posts followed 2 common interests: art and writing.
Through a personal journey though, I have realised that I could no longer view art as a past-time. Slowly it became a necessity for me to create. My moods and energy levels would be quite low when I didn't create for weeks and then when I did create something, I would feel energised and happy for a couple of days until I felt less energised again.
This effect wasn't perceived by me at first. It was subtle. It took me a long time to notice the difference. I put these differences in energy levels to work, weather, food, sleep, daily issues ect... But I realised it was none of the above, and this had a profound effect on me.
I now realise the amazing therapeutic effects of being able to be creative regularly and my intention is to share this experience with others.
The power of Art is extremely under-estimated. Most people would view doing any form of art as a hobby. But it is a very powerful healing tool, one of which I believe, everybody could benefit. But it needs to be explained, used and understood by all. I am far from being an expert at this. I am not an art therapist. i wouldn't be considered an artist either. I didn't study arts. I only have my own experience to back me up and a passion for arts.
But I do hope that through blog posts and youtube videos, I will meet people who feel the same way about art, guides and teachers who can help me spread this message to others. There are so many people who could start to feel better about themselves through creativity. It certainly did it for me.
So that's my goal.
Now I just have to start making youtube videos about it. Never done a youtube video before. And I don't think I wouldn't be the best communicators. But I do feel passionate about this message and so I hope to overcome my own insecurities to do this. And i hope i get support along the way.
Sunday, October 19, 2014
Sunday, June 15, 2014
A floral greeting card design without any flower
Hi Everyone,
Another unusual greeting card made from Lindt chocolate Boxes:


Project recipe:
Another unusual greeting card made from Lindt chocolate Boxes:
And Voila! A floral greeting card design without any flower:
Credit Image: Andrew O'Toole.
Project recipe:
Project
difficulty -easy
2 recycled Lindt Chocolate packaging boxes
Foam squares
1 black marker
Scissors
Tuesday, June 3, 2014
A greeting card that could say " I want to eat you up!"
Pie Minister recycled card making
project
Hi Everyone,
I thought I could come up with another
project with a Pie Minister Packaging Box. I bought 3 for the price of 10 euro in George Arcade and love the pies. (Heidi is my favourite one) I also liked the cool art on the packaging and since the box was hardly used/dirty I decided that it could re-use it.
Also I invested recently in my art projects! Instead of buying blank cards, I found a company called "Eco-craft" that is settled all the way in the UK. They sell recycled blank cards, recycled envelopes and biodegradable transparent sleeves. The delivery cost was a tad expensive. It's a trial. ( They don't have those in Ireland.) I am glad to be using those now, proud even. It makes more sense.
Also I invested recently in my art projects! Instead of buying blank cards, I found a company called "Eco-craft" that is settled all the way in the UK. They sell recycled blank cards, recycled envelopes and biodegradable transparent sleeves. The delivery cost was a tad expensive. It's a trial. ( They don't have those in Ireland.) I am glad to be using those now, proud even. It makes more sense.


(Credit Image: laspeedwing)

And voila! Greeting cards that could say " I want to eat you up!" or "Ciao Bello, going to Italy! Tweet me when you get there!"
Project
recipe:
Project
difficulty -easy
1 recycled Pie Minister packaging box
Foam squares
1 black marker
Scissors
Thursday, February 6, 2014
"My love for you is growing every day" greeting card
Kleenex recycled card making
project
Hi Everyone,
I thought I could come up with another
project for Valentine’s day with an empty Kleenex Box.
I don’t know
where the idea came to me. But I thought it would be nice to create a single flower which would grow leaves in the
shapes of heart from a pot.
For the background
I used a blue paper colour and
highlighted the contours with a black marker.
For the Hearts
I liked the colours of the Kleenex
box. I cut heart shapes out of it and hightlighted the contours with
a black marker.

For the stem
I used a leftover of “let’s eat
in” takeaway bag and highlighted the contours.
For the pot, I used another food
packaging to cut the shape of a pot. Any food packaging could do.
And voila! A card that could say " My love for you is growing every day!"

Project
recipe:
Project
difficulty -moderate
1 recycled Kleenex
box
Foam squares
1 Blue paper colour
1 black marker
Lime green shredded
paper
Scissors
Glue
Sunday, February 2, 2014
Ask him out for coffee for Valentine's day!
“Let’s eat in”
recycled card making project
Hi Everyone,
With Valentine’s day coming up, I came up with another
idea to make cards out of a take-away delivery bag.
I like the colour green (and drinking green tea).
I noticed that the takeaway bag that my housemate gets from ordering food with "Let's eat in" had a nice lime green colour to it.
I thought I could definitely use this to cut the shape of a mug into
it.( see picture below)

For the background
I used a pink paper colour, spread a bit of pink water
paint on it and highlighted the contours with a black marker.
For the mug
Step 1: I cut the shape of a mug from the take away bag,
Step 2: highlight the contours with a permanent marker,
Step 3: drew on the mug and draw the handle on the card.
Step 4: Put some foam squares at the back and stick it on
the card.
For the steam effect
of the drink on the card
I used a handful
of lime green shredded paper (which I got from hampers). I rolled and glued the
circle part on the card but you can draw swirls instead.

And there you have it: an excuse for Valentine's day to ask your cute colleague to have a cup of coffee or tea with you!


Picture credit: Andrew O’Toole. Available for freelance
and teaching workshops.
Friday, January 31, 2014
Can you re-use Christmas wrapping paper?
Yes! Surprisingly you can! Even if it is creased! Here is how:
I know Christmas is over but here's a project of recycling wrapping
paper that I did to make cards.

By the way, if the picture looks so good, it's because I got the help of a great photographer! He taught me how to setup a studio very cheaply and made these great pictures. His name is Andrew O'Toole and I definitely recommend him. He does workshops and freelance.
To return to our tutorial, the good thing about making these cards is that they are cheap to make and you don’t have to cut and measure the exact square shapes for every part of the tree to make a good impression. ( which is quite
time consuming let’s be honest here, especially if you are doing a few!)
First:
Cut approximately a square shape into your creased wrapping paper and fold it from corner to corner with the patterned facing upwards. ( if it doesn't fit, exactly, then cut it so it does!)

step3: Open your paper up, it will now have a cross in the middle.
step4: Then crease your paper in half ( so it becomes a rectangle shape and if it doesn't exactly fit like a rectangle, you can cut it so it does!)), bring it back to its square shape and fold it the other way.
Now you are a star shape in the middle of your paper.
step5: Then next part is the tricky bit: you need to push up the center from the white side it should pop into this position below leaving you with two of the folds facing down. Push the two full triangles together.

step 6: Fold the triangle making yet another triangle! You do that by pull the point downwards so that the edge of this section of the triangle is butted up to the centre fold you have made.You do the same for the side and then for the other 3 squares.
step 7: then I glued the back of the triangle and lay your 3 triangles out in a row from large to small.
step 8: I glued a pretty ribbon at the top of the card and the bottom of the card and voila.

For a detailed instruction on how to do the Christmas tree, below is a link to a blog that explains it step by step (better explained.):
http://cliona-at-night-owl.blogspot.ie/2011/12/folded-christmas-tree-card-tutorial.html
Project
recipe:
Project
difficulty: easy
- Already used wrapping paper.
- Scissors
- 2 pieces of ribbon
- Glue
I hope this helps.
Laura.
Thursday, January 9, 2014
Santa with a Moustache Christmas Card
Hi Everyone,
A friend of mine's father used to have a moustache and suggested to make a card of Santa with a Moustache! I thought that was brilliant. So I did just that!
Project 1: Santa with a Moustache.
I cut a moustache shape from a black packaging.
For the top part of the card, I cut the roof design of an "El Paso" Packaging to give a Spanish feel on the card.

 For the bottom part of the card, I cut the edge of a Doily Set Paper to give the effect of my Santa standing on a little mount of snow. This is to give the intricate design of the snow.
For the middle part, I had a Santa "left over" from a card making kit so I use it and raised him with foam squares.
Project 2: Making an Owl Greeting Card.
I also had someone I know who really likes Owls, so I made a card for that person out of a pink divider tab ( for the body part) and Thornston Chocolate packaging for the wings.
For the belly, I used a traditional hole punch and used the paper bits for the dots. I use Christmas Decoration packaging to make the purple flower. I didn't invent that design. I looked on the Internet and find a cute owl design which I copied.

Project 3: Making a Cut Cat Greeting Card.
I know someone who likes Cats. Again I didn't invent that design. I looked on the Internet and find a cute cat design which I copied. I used a red divider tab for the background and a blue divider tab for the cat's body. I used a Jacob's Biscuits for Cheese packaging for the orange/yellow ears and paws.

Sorry for the quality of the images. I took a quick picture before giving them away.
I like a challenge so if there's something you have in mind as a greeting card for someone special for Valentine's Day or just to say Hello, let me know and I'll try to do it out of recycled materials.
Because it is rather time consuming, I charge 3 euros per card.
A friend of mine's father used to have a moustache and suggested to make a card of Santa with a Moustache! I thought that was brilliant. So I did just that!
Project 1: Santa with a Moustache.
I cut a moustache shape from a black packaging.
For the top part of the card, I cut the roof design of an "El Paso" Packaging to give a Spanish feel on the card.
For the middle part, I had a Santa "left over" from a card making kit so I use it and raised him with foam squares.
Project 2: Making an Owl Greeting Card.
I also had someone I know who really likes Owls, so I made a card for that person out of a pink divider tab ( for the body part) and Thornston Chocolate packaging for the wings.
For the belly, I used a traditional hole punch and used the paper bits for the dots. I use Christmas Decoration packaging to make the purple flower. I didn't invent that design. I looked on the Internet and find a cute owl design which I copied.
Project 3: Making a Cut Cat Greeting Card.
I know someone who likes Cats. Again I didn't invent that design. I looked on the Internet and find a cute cat design which I copied. I used a red divider tab for the background and a blue divider tab for the cat's body. I used a Jacob's Biscuits for Cheese packaging for the orange/yellow ears and paws.
Sorry for the quality of the images. I took a quick picture before giving them away.
I like a challenge so if there's something you have in mind as a greeting card for someone special for Valentine's Day or just to say Hello, let me know and I'll try to do it out of recycled materials.
Because it is rather time consuming, I charge 3 euros per card.
Monday, January 6, 2014
How to make a simple christmas wreath on a shoestring
I noticed some amazing Christmas wreaths on sale in flower shops and in design shops round the City center back in mid-December.
Although I had never made a Christmas wreath before in my life, I decided to give it a go.
I noticed that those shops used beautiful dark willow branches to make their own Christmas wreaths.
Unfortunately the price of willow branches was minimum 4 euro added to the price of buying a wire and bows and other little decorations, the cost of my wreath was going to be about the same as the ones in the shops so I thought to give it a miss.
Coming home one evening I noticed fallen branches on the pavement (blown away with the wind we have had lately) and those branches seem to be very flexible, nice and bare enough to make a wreath. "Hurrah!" I thought, " here's my wreath!"
So I collected them.
I wanted to add pine cones to my wreath too and found some as well on the ground near I live.
Surprisingly enough, I had a red wire and had bought previously Christmas ribbons ( see previous post: http://laspeedwing.blogspot.ie/2013/12/how-to-make-pretty-christmas-tree-out.html )
I found red bows and silver bells in a pound shop and so all I had to do now was to start putting all this together.
So this is my project recipe:
- red wire
- mini pine cones ( attached to broken branches if possible)
- dead branches
- scissors
- 5 red bows
- 3 silver bells

First I divided the branches into 2 bunches of branches and attached them with a red wire.

For the next part, I needed an extra pair of hands to hold the 2 bunches of branches together and used my red wire on each side again. That's 4 ties around the branches.

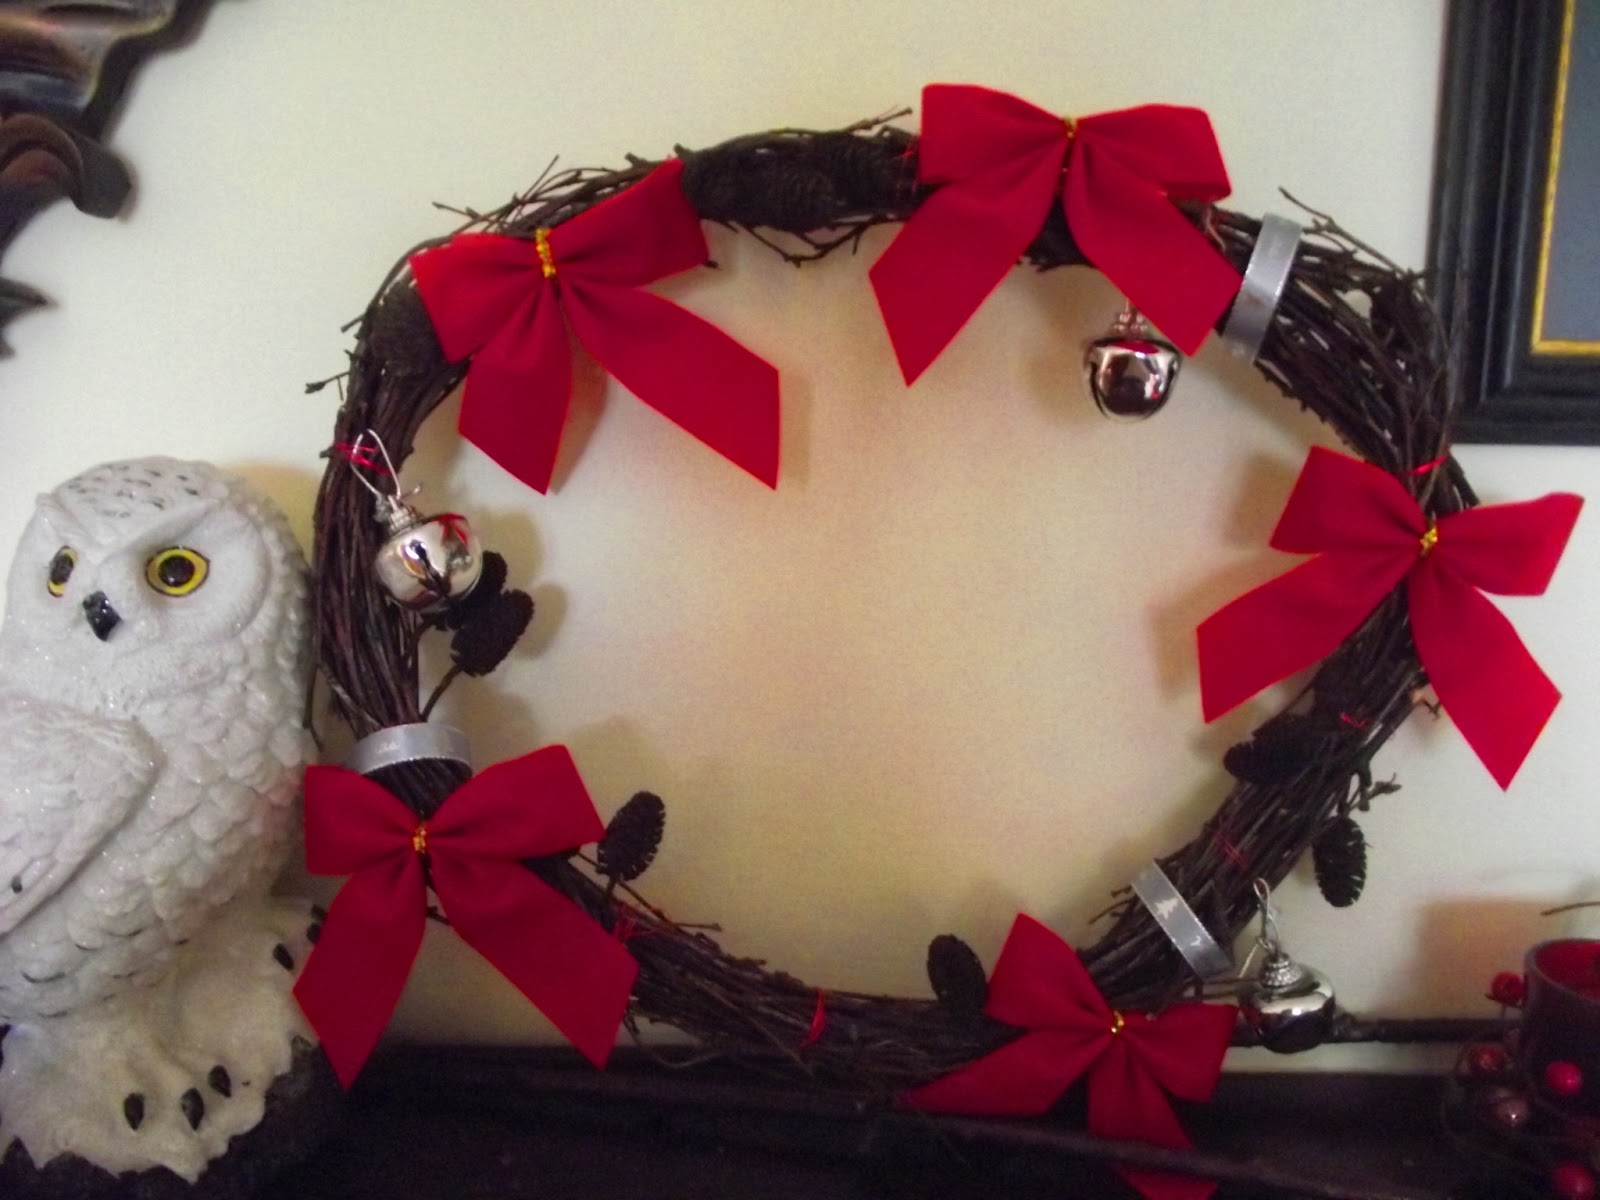
In fact just between you and me, I was quite proud of myself to offer this as a Christmas gift to a friend of mine. Eco friendly enough and limiting in my own little way the frantic consumerism at Christmas ;-)
Subscribe to:
Posts (Atom)